Easy Chocolate Lava Cake for Beginners
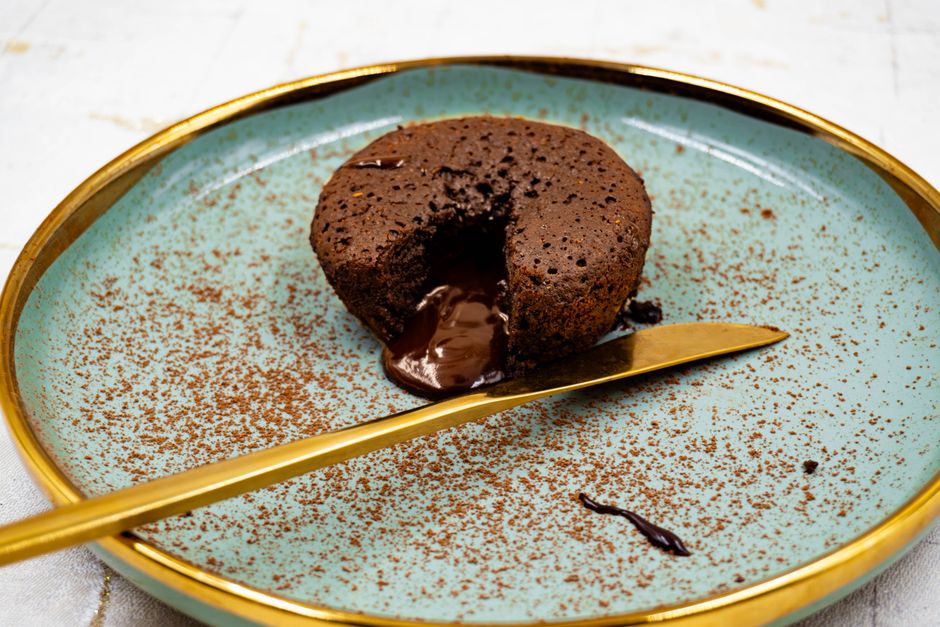
Molten chocolate cakes, often found on restaurant dessert menus, are known for their contrast between a delicate crisp exterior and a warm flowing center. For those new to baking, this dessert may seem intimidating. However, the process relies on a few basic ingredients and a clear understanding of how heat interacts with the batter. By focusing on the preparation method rather than expecting a perfect outcome on the first attempt, anyone can work toward achieving a result that resembles a professionally made lava cake.
This article explores the fundamental aspects of making chocolate lava cakes at home. Instead of promising a guaranteed result, it describes the steps, the role of each ingredient, and the variables that influence the final texture. Beginners can use this information as a framework to build their own experience. With practice and attention to detail, a satisfying dessert is within reach.
The Science Behind a Molten Center
A chocolate lava cake is essentially a small cake that is intentionally underbaked in the center. The batter contains chocolate, butter, eggs, sugar, and a small amount of flour. When placed in a hot oven, the edges of the batter cook and set first, forming a cake-like structure. The center remains liquid because it does not reach the same internal temperature in the short baking time. This effect depends on several factors, including the oven temperature, the size and material of the ramekin, and the precise ratio of ingredients.
Understanding this process helps bakers adjust their approach. For example, a higher oven temperature can cause the exterior to set faster while the center stays fluid. Conversely, a longer bake time or lower temperature can lead to a fully cooked cake without a molten core. The cake continues to cook from residual heat even after being removed from the oven, so the resting period before serving also plays a role.
Essential Ingredients and Their Contributions
Each ingredient in a lava cake serves a specific purpose. High-quality dark chocolate with at least 60% cocoa solids provides the deep flavor and helps create the right consistency when combined with butter. Butter adds richness and moisture, and it also affects how the batter spreads during baking. Eggs are crucial: they provide structure through proteins that coagulate when heated, but the yolks also add fat that keeps the center soft. The amount of egg white relative to yolk influences how firm the outer layer becomes.
Sugar not only sweetens the batter but also raises the temperature at which proteins coagulate, which can influence the browning of the crust. All-purpose flour is used in a minimal quantity, typically just a tablespoon or two. This small amount of flour helps give the cake enough structure to hold its shape when unmolded, without making the batter too dense. Salt and vanilla extract are often added to enhance flavor without affecting the baking behavior.
Butter and chocolate should be melted together until smooth, and then allowed to cool slightly before adding the eggs. If the mixture is too hot, it can cook the eggs prematurely, leading to a different texture. This step illustrates how temperature management matters even before the batter enters the oven.
Step-by-Step Preparation Process
Begin by preparing the ramekins. Lightly butter the inside of each ramekin, then dust with cocoa powder or granulated sugar. This coating helps the cakes release easily after baking and contributes to the outer crust. Place the ramekins on a baking sheet for easier handling.
Melt the chocolate and butter together, either in a heatproof bowl over simmering water or in short bursts in a microwave. Stir until smooth and let it cool for a few minutes. In a separate bowl, whisk the eggs and sugar until they are pale and slightly thickened. This step incorporates air, which can affect how the batter rises in the oven. Pour the cooled chocolate mixture into the egg mixture, folding gently to combine. Sift the flour and salt over the batter and fold until just incorporated. Overmixing at this stage can develop gluten, which may make the cake tougher.
Divide the batter evenly among the prepared ramekins. The batter can be refrigerated for a short time before baking, which may affect how quickly the center sets. When ready to bake, preheat the oven to a high temperature, typically around 425°F (220°C). Bake for exactly 12 to 14 minutes, depending on the size of the ramekin and the desired consistency. The edges should look set and slightly puffed, while the center jiggles when gently shaken.
After removing from the oven, let the cakes rest for about one minute. Run a thin knife around the edge of each ramekin to loosen the cake, then invert onto a plate. The cake should slide out easily if the ramekins were properly greased and dusted.
Factors That Influence the Final Texture
Several variables affect whether the cake has a gooey center or a fully cooked interior. The size of the ramekin is one of the most significant. A smaller ramekin will cook through more quickly because the batter is thinner, while a wider, shallower dish may cause the center to set faster. Ramekin material also matters: ceramic retains heat longer, which can continue cooking the cake after removal, while metal conducts heat more evenly.
Oven temperature accuracy is another critical factor. An oven that runs slightly hot can cause the exterior to overbrown before the center is warm enough to stay liquid. An oven that runs cool may require a longer bake time, leading to a fully set cake. Using an oven thermometer is one way to gain more control over this variable. Additionally, the batter temperature at the time of baking influences how quickly the outside sets. Chilled batter can buy a few extra seconds before the center begins to cook, which may be useful for those who want a more pronounced liquid center.
The resting time after baking also matters. A longer rest allows residual heat to travel inward, cooking the center further. For a very runny center, the cake should be served immediately after unmolding. For a slightly thicker but still soft center, waiting an additional minute or two before serving can be appropriate.
Finally, the ratio of egg whites to yolks can be adjusted. Using whole eggs gives a balance of structure and richness. Some recipes use an extra yolk for a richer, more fluid center. Experimenting with such small modifications helps bakers discover their preferred texture over time.
Common Challenges and How to Approach Them
Beginner bakers sometimes encounter cakes that are too firm throughout. This often happens when the baking time is too long, the ramekins are too small, or the oven temperature is too low. Reducing the bake time by a minute or two, using larger ramekins, or increasing the oven temperature can shift the result toward a softer center. It is important to note that these adjustments do not guarantee a specific outcome; they simply change the conditions under which the batter cooks.
Cakes that collapse or stick to the ramekin are another common issue. Collapse can occur if the batter is overmixed, causing too much air to be incorporated, or if the ramekins are not properly greased. Sticking usually indicates that the buttering and dusting step was insufficient. Using a pastry brush to coat every surface of the ramekin with softened butter, followed by a generous dusting of cocoa powder, helps create a nonstick barrier.
Some bakers find that the center is too runny. This can be addressed by increasing the bake time by a minute, ensuring the batter is not chilled too much before baking, or using a slightly higher proportion of flour. Again, each adjustment is a variable that can be tested in small increments.
Over time, keeping notes on bake times, oven temperatures, and ingredient brands can help build a personal reference for consistent results. The process of making chocolate lava cakes is as much about observation and adaptation as it is about following a recipe.